
NIRVANA
[Airflow] Airflow DAG 작성 연습 및 Backfill 이해하기 본문
Airflow란?
- 파이썬으로 작성된 데이터 파이프라인 (ETL) 프레임워크
- 다양한 데이터 소스와 데이터 웨어하우스를 쉽게 통합해주는 오퍼레이터의 역할을 함
- airbnb에서 시작한 아파치 오픈소스 프로젝트이자 가장 많이 사용되는 데이터 파이프라인 관리 작성 프레임워크
- 데이터 파이프라인 스케줄링 지원 및 웹 UI 제공
Airflow 구성

- 총 다섯 개의 컴포넌트로 구성
- 웹 서버
- Flask로 구성
- DAG를 워커에게 배정하는 역할을 수행
- 웹 UI를 통해 스케줄러 및 DAG의 상황을 시각화
- 스케줄러 - 데이터 파이프라인 실행 및 파이프라인 트리거 실행 (master 역할)
- 워커 - 실제 task를 실행하는 노드, airflow의 scaling = 워커 노드의 수를 ↑
- 메타 데이터 데이터베이스 - 스케일링, 워커, 파이프라인의 메타 정보를 저장하는 데이터베이스
- sqlite가 기본으로 설치되나 대부분 Mysql 혹은 Postgresql을 연결하여 사용
- 큐
- 보통 다수의 서버로 구성된 경우에만 사용하나 특정 상황에 따라 싱글 서버에서도 큐를 사용
- 특정 파이프라인의 특정 task가 어떤 워커에서 실행될 것인지 미리 결정하지 않고, 큐에 task를 넣어둠 → 노는 워커가 발생할 경우, 큐에 있는 task를 읽고 실행하는 방식
- 웹 서버
+) DAG Directory
- 작성한 DAG를 모아둔 곳, airflow가 주기적으로 탐색하여 데이터 파이프라인을 확인 및 DB에 기록 → 스케줄링 되어 워커에서 실행될 수 있도록 함
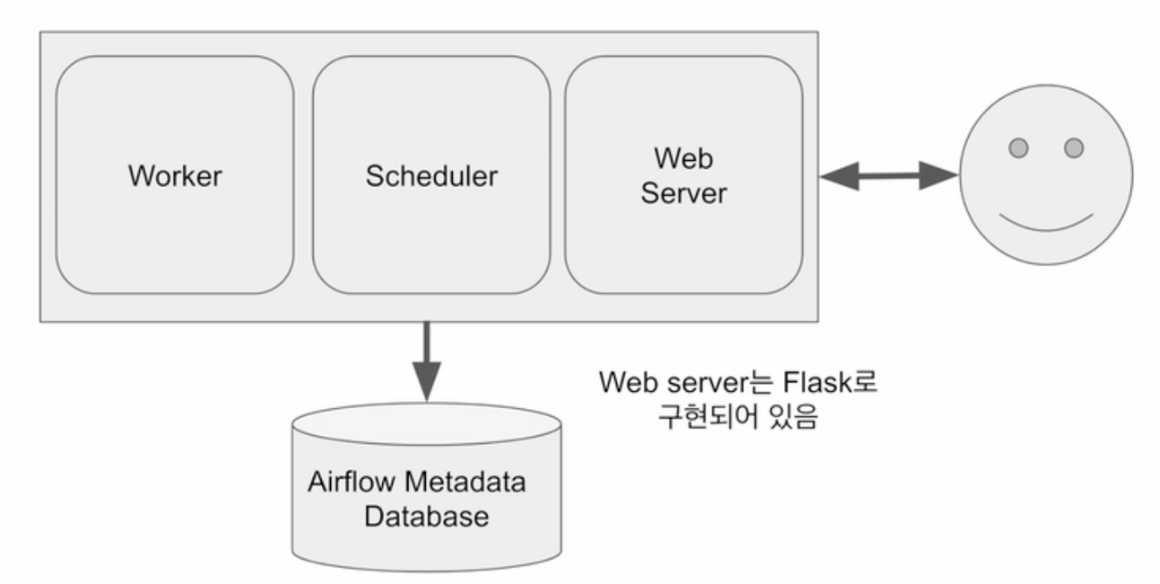
Airflow 구조 - 서버 1대일 경우
- 워커, 스케줄러, 웹 서버가 한 대의 서버에서 함께 실행되는 모습
- 용량 및 CPU에 제한이 존재 → 동시에 실행할 수 있는 task에 제약 O
- 워커 노드의 서버 CPU 및 용량 만큼의 task를 실행 가능
- 데이터 파이프라인의 수가 많아진다면 워커 노드 한대만으로는 부족해짐
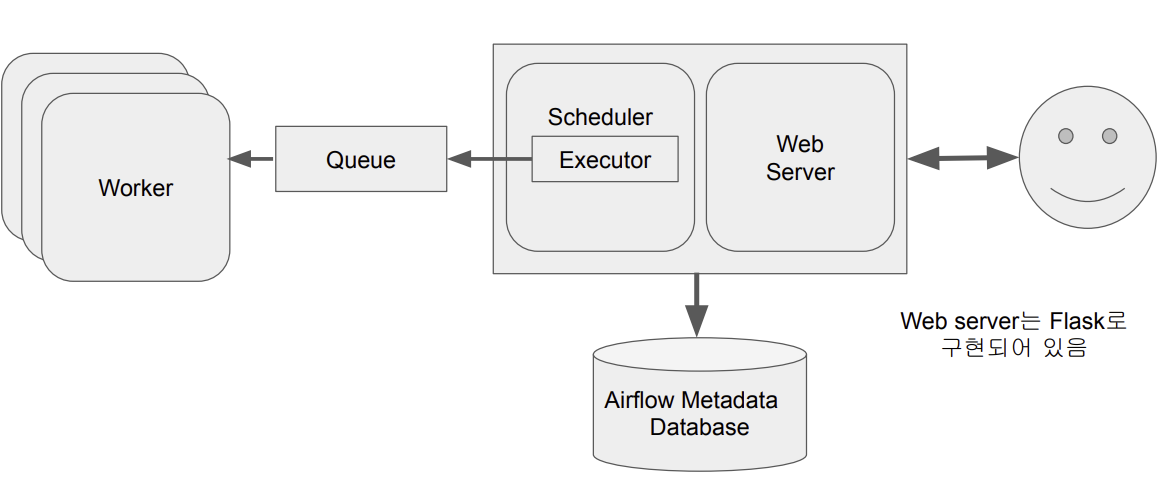
Airflow 구조 - 다수 서버로 구성된 경우
- 워커를 별도의 서버에 세팅하여 워커 노드의 수를 증가
- 큐가 스케줄러와 워커 사이를 통신할 수 있게 해줌
- task를 바로 워커에 넘기는 것이 아닌, executor를 통해 워커에 할당 → 즉, executor에 따라 큐 사용 여부가 결정!
Airflow Executor 종류
- Sequential Executor
- Local Executor
- Celery Executor
- Kubernets Executor
- Celery Kubernetes Executor
- Dask Executor
DAG란?
- Directed Acyclic Graph의 줄임말
- Airflow에서 ELT 파이프라인을 부르는 명칭<< 이기도
- DAG는 1개 이상의 task로 구성
ex) 3개의 task로 구성된다면 Extract / Transform / Load로 구성
Task란?
- airflow의 오퍼레이터로 생성
모든 Task에 필요한 기본 정보
default_args = {
    'owner': 'yerin', #dag 작성자
    'start_date': datetime(2025, 1, 25, hour=0, minute=00), #dag 시작일
    'end_date': datetime(2025, 1, 26, hour=23, minute=00), #dag 종료일
    'email': ['yerin@example.com'],  #알림 받을 이메일
    'retries': 1, #실패시 DAG 재시작 횟수
    'retry_day': timedelta(minutes=3) #DAG 재시작 시간
}
모든 DAG에 필요한 기본 정보
from ariflow import DAG

test_dag = DAG(
    "dag_v1", #DAG 이름
    schedule = "0 9 * * *", #DAG 스케줄링 규칙
    tags = ['test'], #tag
    default_args = default_args #위에서 설정한 DAG기본 설정!
)
- DAG Schedule은 크론탭 기본 문법을 따름
- 첫번째: 분
- 두번째: 시간
- 세번째: 일
- 네번째: 달
- 다섯번째: 요일
ex) 0 * * * * : 매달, 매일, 매 요일, 매 시 0분에 실행
0 12 * * * : 매달, 매일, 매 요일, 12시 0분에 실행
Airflow docker-compose.yaml 파일 뜯어보기
https://nervertheless.tistory.com/202
[Apache Airflow] 도커로 환경 구축하기
1. docker-compse.yaml 파일 다운로드 받기 https://airflow.apache.org/docs/apache-airflow/2.9.3/docker-compose.yaml에서 우클릭을 통해 docker-compose.yaml 파일을 다운로드 받는다. yaml 파일에 정의되어 있는 것들airflow-s
nervertheless.tistory.com
야믈 파일 다운 방법은 여기서 ^_^
- 기본 설정 뜯어보기
 #Yaml 앵커(&)와 참조(*)를 사용하여 반복되는 설정 재사용을 위한 공통 설정 정의
x-airflow-common:

  #airflow-common으로 정의한 설정을 여러 컨테이너에서 공통적으로 사용할 수 있게 함
  #각 컨테이너는 <<: *airflow-common으로 해당 설정을 참조하게 됨
  &airflow-common

  #사용할 기본 Docker 이미지 지정
  #:-를 사용, AIRFLOW_IMAGE_NAME으로 환경 변수가 설정 되어 있으면 해당 값 사용, 아니면 apache-ariflwo:2.9.1 사용
  image: ${AIRFLOW_IMAGE_NAME:-apache/airflow:2.9.1}

  #컨테이너에 필요한 환경 변수 정의
  environment:

    #역시 여러 컨테이너에서 공통으로 환경 설정 사용할 수 있도록 함
    #각 컨테이너는 <<: *airflow-common-env로 해당 설정 참조
    &airflow-common-env

    #스케줄러에서 사용할 executor 설정
    #airflow 태스크 병렬 처리를 결정함, 여기서는 CeleryExecutor사용
    AIRFLOW__CORE__EXECUTOR: CeleryExecutor

    #airflow 메인 데이터베이스 연결 URL
    #Postgresql을 사용, postgress 서비스의 airflow 데이터베이스에 연결
    AIRFLOW__DATABASE__SQL_ALCHEMY_CONN: postgresql+psycopg2://airflow:airflow@postgres/airflow

    #celery 작업 결과 저장하는 데이터베이스 url
    AIRFLOW__CELERY__RESULT_BACKEND: db+postgresql://airflow:airflow@postgres/airflow

    #celery 작업 브로커로 사용할 데이터베이스의 url
    #redis사용
    AIRFLOW__CELERY__BROKER_URL: redis://:@redis:6379/0

    #암호화에 필요한 키를 설정
    AIRFLOW__CORE__FERNET_KEY: ''

    #DAG가 처음 생성될 때, 비활성화 상태로 시작하도록 ture로 설정
    AIRFLOW__CORE__DAGS_ARE_PAUSED_AT_CREATION: 'true'

    #ariflow 예제 DAG 로드 여부 결정 -> true라서 예제 DAG 로드
    AIRFLOW__CORE__LOAD_EXAMPLES: 'true'

    AIRFLOW__API__AUTH_BACKENDS: 'airflow.api.auth.backend.basic_auth,airflow.api.auth.backend.session'

    #DATA_DIR 변수 설정 ->앞에 AIRFLOW_VAR 키워드를 붙이면 airflow에서 사용 가능한 variables이 자동으로 설정됨
    #DATA_DIR을 /opt/airflow/data로 설정(이건 제가 추가한거입니당~)
    AIRFLOW_VAR_DATA_DIR: /opt/airflow/data
    AIRFLOW__SCHEDULER__ENABLE_HEALTH_CHECK: 'true'

    #추가 python 패키기 설치를 위해 사용(제가 추가한거입니다 22)
    _PIP_ADDITIONAL_REQUIREMENTS: ${_PIP_ADDITIONAL_REQUIREMENTS:- yfinance pandas numpy oauth2client gspread}


  #airflow와 관련된 디렉토리를 호스트 머신에서 Docker 컨테이너로 마운트
  volumes:

      #AIRFLOW_PROJ_DIR: 호스트 머신의 디렉토리 위치를 나타냄 -> 기본값은 현재 디렉토리 .
      #현재호스트 머신의 디렉토리 주소/dags : 컨테이너의 /opt/ariflow/dags로 마운트 << 한다는 뜻
    - ${AIRFLOW_PROJ_DIR:-.}/dags:/opt/airflow/dags
    - ${AIRFLOW_PROJ_DIR:-.}/logs:/opt/airflow/logs
    - ${AIRFLOW_PROJ_DIR:-.}/config:/opt/airflow/config
    - ${AIRFLOW_PROJ_DIR:-.}/plugins:/opt/airflow/plugins
    - ${AIRFLOW_PROJ_DIR:-.}/data:/opt/airflow/data

  #컨테이너 내에서 실행되는 사용자 ID와 그룹 ID 설정
  #기본값은 -50000
  user: "${AIRFLOW_UID:-50000}:0"

  #의존성 지정하기
  #다른 서비스의 시작 상태를 의존 -> redis와 postgres 서비스가 정상적으로 시작 되었는지 확인
  depends_on:

    #역시 여러 컨테이너에서 공통으로 환경 설정 사용할 수 있도록 함
    # 각 컨테이너는 <<: *airflow-common-depends-on으로 설정 참조!
    &airflow-common-depends-on
    redis:
      condition: service_healthy
    postgres:
      condition: service_healthy
- 각 컨테이너 서비스 설정 뜯어보기
#docker compose로 실행할 개별 서비스 정의
services:

  #airflow 메인 데이터베이스로 postgresql 사용
  postgres:
    #기본 이미지로 postgres13 사용
    image: postgres:13

    #데이터베이스 환경변수 설정
    environment:

      #DB 사용자 이름(airflow) / DB 비번(airflow) / DB 이름(airflow)
      POSTGRES_USER: airflow
      POSTGRES_PASSWORD: airflow
      POSTGRES_DB: airflow

    #데이터베이스 데이터를 호스트 머신에 저장, 컨테이너를 재시작해도 데이터 유지할 수 있도록 함
    volumes:
     #postgres-db-volume: 호스트 머신에 있는 docker volumne (docker관리)
     -> volume: 컨테이너가 종료 되거나 삭제되어도 유지하도록 설계된 영구 데이터 저장소
     # /var/lib/postgresql/data : 컨테이너 내부 경로
     # Postgresql은 기본적으로 해당 경로에 데이터베이스 파일(테이블, 설정, 트랜잭션 로그)를 저장
      - postgres-db-volume:/var/lib/postgresql/data


    healthcheck:
      test: ["CMD", "pg_isready", "-U", "airflow"] #상태 체크를 위해 CMD 명령어 사용
      interval: 10s #상태 확인 간격 10초
      retries: 5 #재시도 횟수 5번
      start_period: 5s
    restart: always


  #Celery의 메시지 브로커로 Redis 사용
  redis:
    image: redis:7.2-bookworm

    #컨테이너 내부에서 Redis의 기본 포트 (6379)를 노출
    expose:
      - 6379

    #상태 확인하기
    healthcheck:
      test: ["CMD", "redis-cli", "ping"]
      interval: 10s
      timeout: 30s
      retries: 50
      start_period: 30s
    restart: always

  airflow-webserver:
    <<: *airflow-common
    command: webserver
    ports:
      - "8080:8080"
    healthcheck:
      test: ["CMD", "curl", "--fail", "http://localhost:8080/health"]
      interval: 30s
      timeout: 10s
      retries: 5
      start_period: 30s
    restart: always
    depends_on:
      <<: *airflow-common-depends-on
      airflow-init:
        condition: service_completed_successfully

  airflow-scheduler:
    <<: *airflow-common
    command: scheduler
    healthcheck:
      test: ["CMD", "curl", "--fail", "http://localhost:8974/health"]
      interval: 30s
      timeout: 10s
      retries: 5
      start_period: 30s
    restart: always
    depends_on:
      <<: *airflow-common-depends-on
      airflow-init:
        condition: service_completed_successfully

  airflow-worker:
    <<: *airflow-common
    command: celery worker
    healthcheck:
      # yamllint disable rule:line-length
      test:
        - "CMD-SHELL"
        - 'celery --app airflow.providers.celery.executors.celery_executor.app inspect ping -d "celery@$${HOSTNAME}" || celery --app airflow.executors.celery_executor.app inspect ping -d "celery@$${HOSTNAME}"'
      interval: 30s
      timeout: 10s
      retries: 5
      start_period: 30s
    environment:
      <<: *airflow-common-env
      # Required to handle warm shutdown of the celery workers properly
      # See https://airflow.apache.org/docs/docker-stack/entrypoint.html#signal-propagation
      DUMB_INIT_SETSID: "0"
    restart: always
    depends_on:
      <<: *airflow-common-depends-on
      airflow-init:
        condition: service_completed_successfully

  airflow-triggerer:
    <<: *airflow-common
    command: triggerer
    healthcheck:
      test: ["CMD-SHELL", 'airflow jobs check --job-type TriggererJob --hostname "$${HOSTNAME}"']
      interval: 30s
      timeout: 10s
      retries: 5
      start_period: 30s
    restart: always
    depends_on:
      <<: *airflow-common-depends-on
      airflow-init:
        condition: service_completed_successfully

  airflow-init:
    <<: *airflow-common
    entrypoint: /bin/bash
    command:
      - -c
      - |
        if [[ -z "${AIRFLOW_UID}" ]]; then
          echo
          echo -e "\033[1;33mWARNING!!!: AIRFLOW_UID not set!\e[0m"
          echo "If you are on Linux, you SHOULD follow the instructions below to set "
          echo "AIRFLOW_UID environment variable, otherwise files will be owned by root."
          echo "For other operating systems you can get rid of the warning with manually created .env file:"
          echo "    See: https://airflow.apache.org/docs/apache-airflow/stable/howto/docker-compose/index.html#setting-the-right-airflow-user"
          echo
        fi
        one_meg=1048576
        mem_available=$$(($$(getconf _PHYS_PAGES) * $$(getconf PAGE_SIZE) / one_meg))
        cpus_available=$$(grep -cE 'cpu[0-9]+' /proc/stat)
        disk_available=$$(df / | tail -1 | awk '{print $$4}')
        warning_resources="false"
        if (( mem_available < 4000 )) ; then
          echo
          echo -e "\033[1;33mWARNING!!!: Not enough memory available for Docker.\e[0m"
          echo "At least 4GB of memory required. You have $$(numfmt --to iec $$((mem_available * one_meg)))"
          echo
          warning_resources="true"
        fi
        if (( cpus_available < 2 )); then
          echo
          echo -e "\033[1;33mWARNING!!!: Not enough CPUS available for Docker.\e[0m"
          echo "At least 2 CPUs recommended. You have $${cpus_available}"
          echo
          warning_resources="true"
        fi
        if (( disk_available < one_meg * 10 )); then
          echo
          echo -e "\033[1;33mWARNING!!!: Not enough Disk space available for Docker.\e[0m"
          echo "At least 10 GBs recommended. You have $$(numfmt --to iec $$((disk_available * 1024 )))"
          echo
          warning_resources="true"
        fi
        if [[ $${warning_resources} == "true" ]]; then
          echo
          echo -e "\033[1;33mWARNING!!!: You have not enough resources to run Airflow (see above)!\e[0m"
          echo "Please follow the instructions to increase amount of resources available:"
          echo "   https://airflow.apache.org/docs/apache-airflow/stable/howto/docker-compose/index.html#before-you-begin"
          echo
        fi
        mkdir -p /sources/logs /sources/dags /sources/plugins/sources/data
        chown -R "${AIRFLOW_UID}:0" /sources/{logs,dags,plugins, data}
        exec /entrypoint airflow version
    environment:
      <<: *airflow-common-env
      _AIRFLOW_DB_MIGRATE: 'true'
      _AIRFLOW_WWW_USER_CREATE: 'true'
      _AIRFLOW_WWW_USER_USERNAME: ${_AIRFLOW_WWW_USER_USERNAME:-airflow}
      _AIRFLOW_WWW_USER_PASSWORD: ${_AIRFLOW_WWW_USER_PASSWORD:-airflow}
      _PIP_ADDITIONAL_REQUIREMENTS: ''
    user: "0:0"
    volumes:
      - ${AIRFLOW_PROJ_DIR:-.}:/sources

  airflow-cli:
    <<: *airflow-common
    profiles:
      - debug
    environment:
      <<: *airflow-common-env
      CONNECTION_CHECK_MAX_COUNT: "0"
    command:
      - bash
      - -c
      - airflow
  flower:
    <<: *airflow-common
    command: celery flower
    profiles:
      - flower
    ports:
      - "5555:5555"
    healthcheck:
      test: ["CMD", "curl", "--fail", "http://localhost:5555/"]
      interval: 30s
      timeout: 10s
      retries: 5
      start_period: 30s
    restart: always
    depends_on:
      <<: *airflow-common-depends-on
      airflow-init:
        condition: service_completed_successfully

volumes:
  postgres-db-volume:
Airflow DAG 작성해보기
HelloWorld 출력 DAG 작성
from airflow import DAG
from airflow.operators.python import PythonOperator
from datetime import datetime

#dag 정의
dag = DAG(
    dag_id = 'HelloWorldTest',
    start_date=datetime(2025, 1, 25),
    catchup= False, #시작시간부터 오늘까지 비어 있는 부분도 채울지 말지 여부 결정
    tags = ['first_example'],
    schedule= '0 16 * * *'

)

def print_hello():
    print("hello!")
    return "hello"


def print_goodbye():
    print("goodbye!")
    return "goodbye"


#파이썬 함수 사용하는 파이썬 오퍼레이트 사용, task 정의
print_hello = PythonOperator(
    task_id = 'print_hello',
    python_callable= print_hello, #호출할 파이썬 함수 정의
    dag = dag #어떤 dag에 속한 task인지 정의
)

print_goodbye = PythonOperator(
    task_id = 'print_goodbye',
    python_callable= print_goodbye,
    dag = dag
)

#대그 실행 순서 정의
#순서를 정의하지 않으면 각각 독립적으로 동시에 실행되고 끝
print_hello >> print_goodbye
다음과 같이 python_callable을 사용하여 호출할 파이썬 함수를 정의할 수도 있지만 @데코레이터를 사용하면 좀 더 단순하게 python operator를 사용한 task를 정의할 수 있다.
from airflow import DAG
from airflow.decorators import task
from datetime import datetime

@task
def print_hello():
    print('hello!')
    return 'hello!'

@task
def print_goodbye():
    print('goodbye')
    return 'goodbye!'

with DAG(
    dag_id = 'helloWorldWithDeco',
    start_date= datetime(2025,1,25),
    catchup=False,
    tags = ['decoratorExample'],
    schedule='0 16 * * *'
) as dag:

    print_hello > print_goodbye
task 데코레이터를 사용하면 함수 정의와 동시에 python operator에서 호출할 함수 해당 함수임을 선언할 수 있게 되므로 코드가 단순해진다는 장점을 가지게 된다.
Yahoo Finance API DAG 작성 (1)
Yahoo finance api를 사용하여 apple의 주식 정보를 읽어와 redshift에 적재하는 DAG를 작성해보았다.
Yahoo finance api는 지난 30일의 주식 정보를 반환하게 된다.
Full Refresh로 구현
- DAG 실행 마다 매번 테이블을 새로 만드는 형태로 구성
- 트랜잭션 형태로 작성
from airflow import DAG
from airflow.decorators import task
from airflow.providers.postgres.hooks.postgres import PostgresHook
from datetime import datetime
from pandas import Timestamp

import yfinance as yf
import pandas as pd
import logging


#redshift 연결
def get_RedShfit_connection(autocommit=True):
    hook = PostgresHook(postgres_conn_id='redshift_dev_db')
    conn = hook.get_conn
    conn.autocommit = autocommit

    return conn.cursor()

@task
def get_historical_prices(symbol):
    ticket = yf.Ticket(symbol)
    data = ticket.history()

    records = []

    for index, row in data.iterrows():
        date = index.strftime('%Y-%m-%d %H:%M:%S')

        records.append([date, row["open"], row["High"], row["Low"], row["Close"], row["Volume"]])

    return records

@task
def load(schema, table, records):
    logging.info("load start")

    cur = get_RedShfit_connection()

    try:
        #트랜잭션 시작
        cur.execute("BEGIN;")

        #full Refresh를 위해 테이블이 이미 생성 되어 있다면 drop
        cur.execute(f"DROP TABLE IF EXISTS {schema}.{table};")

        #table 생성
        cur.execute(f"""
                    CREATE TABLE {schema}.{table}(
                        date date,
                        "open" float,
                        high float,
                        low float,
                        close float,
                        volume bigint
                    ); """)

        #테이블에 데이터 추가
        for r in records:
            sql = f"INSERT INTO {schema}.{table} VALUES ('{r[0]}', '{r[1]}', '{r[2]}','{r[3]}', '{r[4]}', '{r[5]}');"
            print(sql)

            cur.execute(sql)
        cur.execute("COMMIT;") #트랜잭션 완료 -> 커밋하여 반영

    except Exception as e:
        print(e)
        cur.execute("ROLLBACK;")
        raise

    logging.ingo('load done')


with DAG(
    dag_id = 'yahoo_finance',
    start_date = datetime(2025, 1, 26),
    catchup= False,
    tags = ['API'],
    schedule= '0 17 * * *'
) as dag:

    result = get_historical_prices("AAPL")
    load("yerin", "stock_info", result)
airflow 스케줄러 컨테이너로 접속하여 다음의 DAG를 실행시켜 보면 아래와 같은 결과가 나온다
exec -it {airflow 컨테이너 ID} /bin/bash

airflow dags test {DAG ID} {실행 날짜}
테이블에 잘 적재되는 것을 확인할 수 있다.
Yahoo Finance API DAG 작성 (2)
Incremental Update로 구현
- DAG 실행 시 매일 하루 치의 데이터가 늘어나도록 구현
- 임시 테이블 생성 및 테이블 레코드 복사
- 임시 테이블에 API에서 읽어온 데이터 적재
- 원본 테이블 삭제 -> 생성
- 원본 테이블에 임시 테이블의 내용을 유니크한 것만 적재
- 트랜잭션 형태로 구성
from airflow import DAG
from airflow.operators import task
from airflow.providers.postgres.hooks.postgres import PostgresHook
from datetime import datetime
from pandas import Timestamp

import yfinance as yf
import pandas as pd
import logging


def get_Redshift_connection(autocommit=True):
    hook = PostgresHook(postgres_conn_id='redshift_dev_db')
    conn = hook.get_conn()
    conn.autocommit = autocommit
    return conn.cursor()


@task
def get_historical_prices(symbol):
    ticket = yf.Ticker(symbol)
    data = ticket.history()
    records = []

    for index, row in data.iterrows():
        date = index.strftime('%Y-%m-%d %H:%M:%S')
        records.append([date, row["Open"], row["High"], row["Low"], row["Close"], row["Volume"]])

    return records


def _create_tabel(cur, schema, table, drop_first):

    if drop_first:
        cur.execute(f"DROP TABLE IF EXISTS {schema}.{table};")

    cur.execute("""
                CREATE TABLE IF NOT EXISTS {schema}.{table}(
                    date date,
                    "open" float,
                    high float,
                    low float,
                    close float,
                    volume bigint);
                """
                )

@task
def load(schema, table, records):
    logging.info("load started")
    cur = get_Redshift_connection()

    try:
        cur.execute("BEGIN;")

        #원본 테이블이 없으면 생성 -> Full Refresh에서는 항상 만들고 시작하기 때문에 ㄱㅊ인데
        #incremental update에서는 원본 테이블이 유지 되어야 하므로 생성
        #drop_first가 False = 처음 실행하는 것
        _create_tabel(cur, schema, table, False)

        #임시 테이블로 원본 테이블의 내용 복사
        cur.execute(f"CREATE TEMP TABLE t AS SELECT * FROM {schema}.{table}")

        for r in records:
            sql = f"INSERT INTO t VALUES ('{r[0]}', {r[1]}, {r[2]}, {r[3]}, {r[4]}, {r[5]});"
            print(sql)
            cur.execute(sql)

        #원본 테이블 생성
        _create_tabel(cur, schema, table, True)
        # 임시 테이블 내용을 원본 테이블로 복사
        cur.execute(f"INSERT INTO {schema}.{table} SELECT DISTINCT * FROM t;")
        cur.execute("COMMIT;")   # cur.execute("END;")

    except Exception as e:
        print(e)
        cur.execute("ROLLBACK;")
        raise
    logging.info("load done")

with DAG(
    dag_id='incremental_update_yf',
    start_date = datetime(2025, 1, 26),
    catchup= False,
    tags=['API'],
    schedule = '0 18 * * *'
) as dag:

    results = get_historical_prices("AAPL")
    load("yerin", "stock_info_v2", results)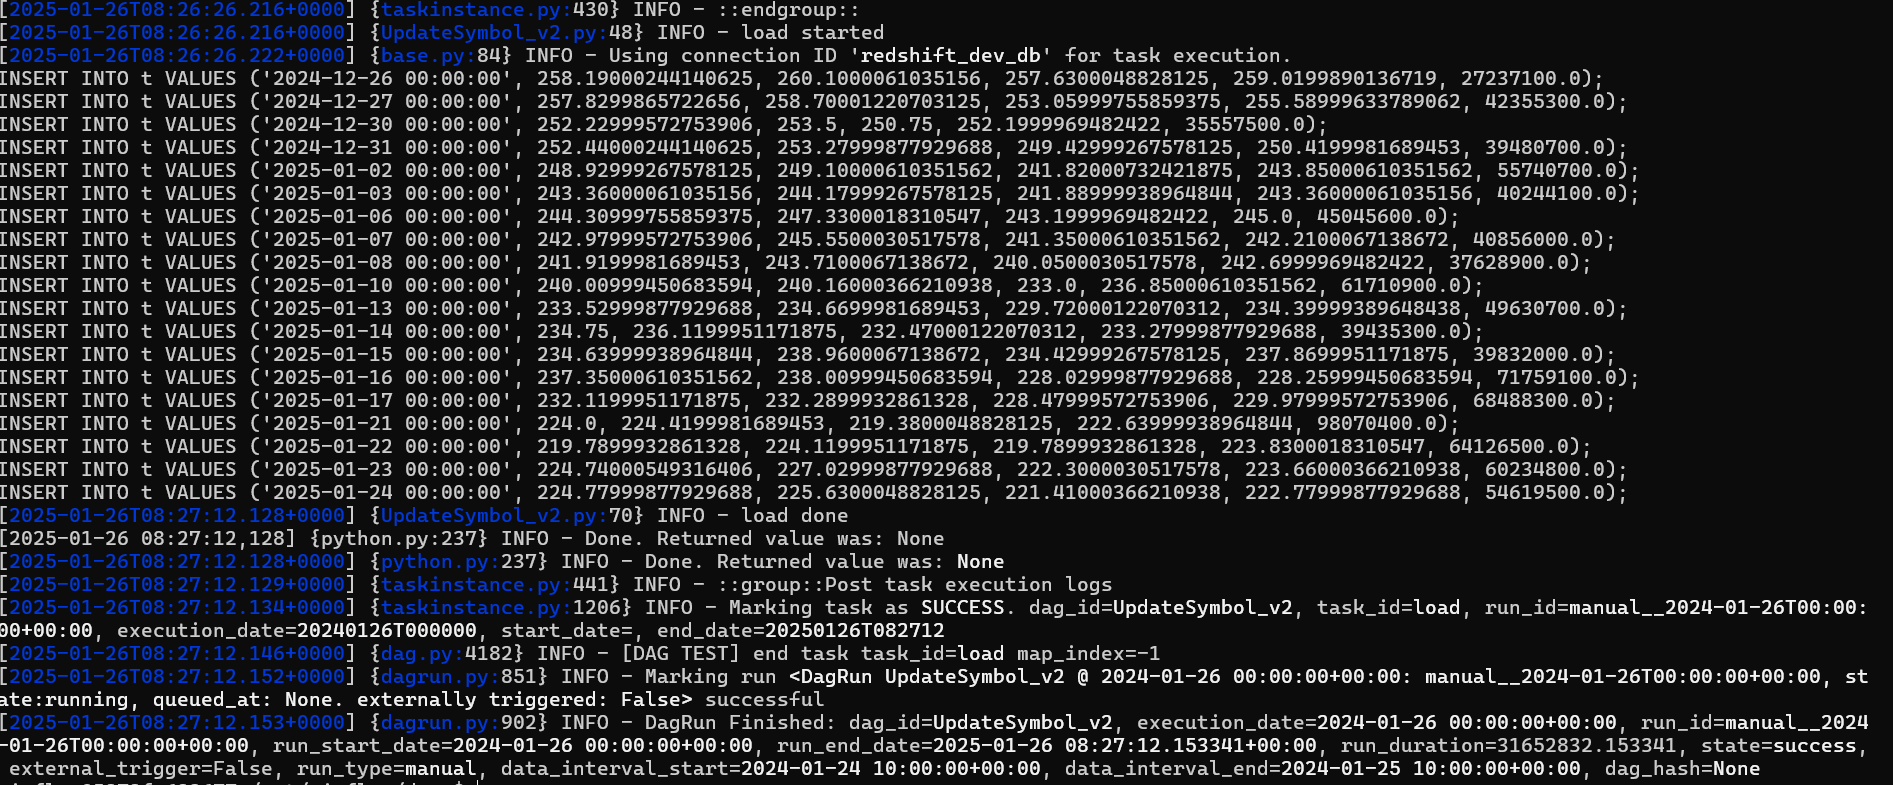
임시 테이블에 적재되는 모습을 확인할 수 있다.
BackFill 이해하기
- BackFill은 실패한 데이터 파이프라인을 재실행 혹은 읽어온 데이터들의 문제로 다시 읽어와야 하는 경우를 의미
- Full Refresh의 경우 데이터에 문제가 생기거나 데이터 파이프라인이 실패하여도 다시 데이터를 읽어오면 문제가 해결되므로 비교적 간단하게 해결 가능
- Incremental Update의 경우 데이터에 위와 같은 상황으로 문제가 생길 경우 문제가 복잡해짐
- Airflow에서는 exectution_date를 통해 엔지니어가 Backfill을 쉽게 구현할 수 있도록 지원하고 있음
- ETL 별로 실행 날짜와 결과를 메타 데이터 데이터베이스에 기록
- 모든 DAG의 실행에는 'execution_date'가 지정, execution_date으로 채워야 하는 날짜와 시간이 DAG로 넘어오게 됨
start Date vs execution Date
| start date | execution date |
| DAG가 처음 읽어와야 하는 데이터의 날짜 및 시간 DAG의 실제 첫 실행 날짜는 start_date + DAG의 실행 주기가 됨 |
DAG가 읽어와야 하는 데이터의 날짜와 시간 airflow에서 시스템 변수로 지정 |
ex) 2020-08-10 02:00:00으로 start_date이 설정된 daily job이 있을 때, 지금 시간이 2020-08-13 20:00:00이고, 처음으로 해당 job이 활성화 되었다면 이 job이 실행되는 횟수는 몇 번일까?
- 2020-08-11 (에 2020-08-10 데이터를 읽어 옴, execution date = 2020-08-10)
- 2020-08-12 (에 2020-08-11 데이터를 읽어 옴, execution date = 2020-08-11 )
- 2020-08-13 (에 2020-08-12 데이터를 읽어 옴, execution date = 2020-08-12 )
→ 총 3번 실행 됨
'DataEngineering' 카테고리의 다른 글
| [Kafka] Kafka 구성 요소 살펴보고 간단 실습해보기 (0) | 2025.02.16 |
|---|---|
| [Airflow] 항공권 정보 ETL 파이프라인 만들어보기 (0) | 2025.02.02 |
| [SnowFlake] S3버킷 연동 및 Json 데이터를 관계형 테이블에 로드 (2) | 2024.12.26 |
| 아파치 파케이(Parquet)와 열 지향 데이터베이스 (1) | 2024.09.22 |
| [Apache Airflow] 웹 크롤링 DAG 작성하기 (1) | 2024.09.15 |


